The term “Desk-Top Publishing” was actually coined by Paul Brainerd, President of Aldus Corporation. Desk top Publishing is a software program which helps layout the pages individually for a brochure, newsletters, leaflet, receipt book, visiting card, advertising design, magazine and books of all size and kinds. If a person wants to be a skill DTP operator, he has a good knowledge of typing and magazine design style.
This Desk Top Publishing contains the following individual programs-
- Adobe Page Maker.
- Adobe Photoshop
- Corel Draw
- Leap Office ( Assamese / Hindi / Bengali Etc.)
It is most useful Package in D.T.P (Desk Top Publishing) to create News Papers, Layouts, receipt book, Visiting Cards, advertising design, Notes etc. D.T.P operators commonly use PageMaker for their daily work. By using PageMaker we can create different types of headings, sub-headings format, We can format the written Text with the help of different commands.
Differences Between MS- WORD and PAGEMAKER
- Page Maker is several group of text, But MS-Word is only one group of text.
- It is needed to less time to find out a page in Page Maker from many pages than MS-WORD.
- Pagemaker is needed for best output printing job, It means it is easily to printing in a particular page size like (A4/ Letter/ Legal/ A3/ B5 etc.). But this is not easily applicable in MS-WORD.
- “Page Up”/ “ Page Down” both the Keys do not follow their function in Page Maker which are functional in MS-WORD.
- “Format” is absent in Pagemaker. Instead of “ Format” , “Utilities” is available in Pagemaker.
To Open Procedure Adobe Pagemaker 7.0
- Click Start.
- Click All Programs
- Click Adobe
- Click Pagemaker 7.0
- Click Adobe Pagemaker 7.0
To Create Procedure a New Document
1. Click on File. The file menu will appear.
2. Click on new
3. The Document Setup Dialog Box will appear
( Enter the Appropiate setting for your Document in the Document Setup Dailog Box.)
4. Click on OK.
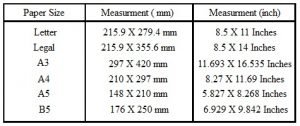
Paper Size
Laser printer accept cut sheets only. Commercially available cut out sheets sizes are listed below :
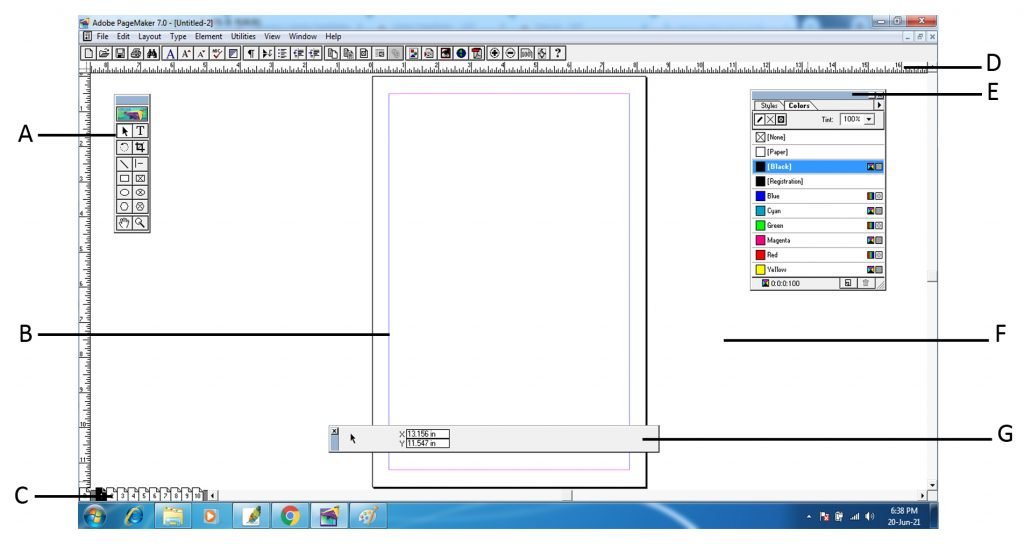
A. The toolbox includes tools for creating or editing objects.
B. Margins appear as dotted or pink lines.
C. Page icons show the master pages (L for left, and R for Right) and the regular pages in the publication.
D. Rulers help you align objects on the page.
E. The Colors and Styles palettes are used to add, delete, and edit colors and styles.
F. The pasteboard stores items for later use.
G. The Control palette provides commands for making precise changes to text and graphics.
The icons in the toolbox represent the tools you use in PageMaker. To select a tool, click it. If the toolbox restricts your view of your work, drag its title bar to move it, or choose Window > Hide Tools to close the toolbox.

A. Use the POINTER TOOL (Shift+F1) to select, move, and resize text objects and graphics.
B. Use the ROTATING TOOL (Shift+F2) to select and rotate objects.
C. Use the LINE TOOL (Shift+F3) to draw angle lines in any direction.
D. Use the RECTANGLE TOOL (Shift+F4) to draw squares and rectangles.
E. Use the ELLIPSE TOOL (Shift+F5) to draw circles and ellipses.
F. Use the POLYGON TOOL (Shift+F6) to draw polygons.
G. Use the HAND TOOL (Shift+F7) to scroll the page, or to preview and test hyperlinks.
H. Use the TEXT TOOL (Shift+Alt+F1) to type, select, and edit text.
I. Use the CROPPING TOOL (Shift+Alt+F2) to trim imported graphics.
J. Use the CONSTRAINED LINE (Shift+Alt+F3) tool to draw straight vertical or horizontal lines.
K. Use the FRAME TOOLS to create placeholder shapes. Rectangle Frame (Shift+Alt+F4), Ellipse Frame (Shift+Alt+F5), Polygon Frame (Shift+Alt+F6)
L. Use the ZOOM TOOL (Shift+Alt+F7) to magnify or reduce an area of the page.
If the Toolbox is not available on the screen, you can perform these steps to show the Toolbox:
- Click on Window. The window menu will appear.
- Click on Show Tools.
( The Toolbox will appears in front of your Document window. )
If you want to hide the Toolbox. you can perform these steps to Hide the Toolbox:
- Click on Window. The window menu will appear.
- Click on Hide Tools to hide the Toolbox
The Contrrol palette is the main palettes. If you have a text object selected with the pointer , the control palette offers controls that allow you to move, resize, skew, flip, or rotate the text object as a unit.
If the Control Palette is not available on the screen, you can perform these steps to show the Control Palette:
- Click on Window. The window menu will appear.
- Click on Show Control Palette
( The Control Palette will appears in front of your Document window.)

If you want to hide the Control Palette. you can perform these steps to Hide the Control Palette:
- Click on Window. The window menu will appear.
- Click on Hide Control Palette to hide the Control Palette.
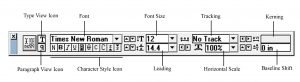
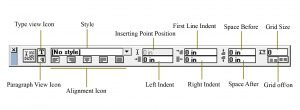
Control Palette has 3 containing palette
- Font Control Palette. ( When you click T then this palette come on the screen)
- X / Y Contral Palette. ( When you click select pointer then this Palette come on the screen)
- Width/ height control Palette.( When you select a line / Ellipse / polygon / rectangle then this palette come on the screen )
- Click on File
- Click on Document setup
- The Document Setup Dialog Box will appear
- Use the Page size pop-up menu to choose your page size like A4 / Letter / Legal / A3 etc.
- Select a standard page size from the Page Size pop-up menu. When you select a page size, its dimensions appear in the Dimensions boxes.
- Use the Orientation, select Tall for a page that is taller than it is wide (Portrait orientation), or select Wide for a page that is wider than it is tall (Landscape orientation).
- Click Double-sided to set Inside and Outside margins to accommodate binding on pages that will be printed on two sides and to make the Facing Pages option available. Deselect Double-sided if you intend to print your pub-lication on one side of the paper (single-sided) and don’t want to turn on Facing Pages.
- Click Facing Pages if you want left and right pages displayed together (as two-page spreads); make sure that you first select Double-sided.
- To Insert more pages enter the numbers in Number of pages, Start Page Number from.
- To change the margins, type the values in the Margins area, and then click OK.
After Document Setup
- Click on View Menu
- Click on Actual Size ( For writting your text / To reading your already written text )
- or, Click on Fit in Window ( For designing your text )
For Typing a text, then click T, on Toolbox
For Highlight your text : Press T, Move the Text select Pointer over the required text.
- Select the characters to be formatted.
- Click On Type Menu, The type menu will appear.
- Click on Character or Ctrl+T
- The Character Specification dialog box appears.
( Make the appropriate changes in the dialog box.) - Click on OK
- Select the paragraph you want to format
- Click On Type Menu, The type menu will appear.
- Click on Paragraph. The Paragraph Specification dialog box appears. ( Make the approprioate changes of your choice in the dialog box. )
- Click on OK.
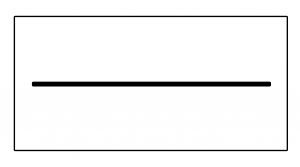
DRAWING LINE
PageMaker has two Line – a) Angle Line b) Straight Line
- Select the line (Angle/Straight) tool from the toolbox.
The cursor changes to a cross-hair. - Click and drag on the document to draw your line. As you drag, a line appears.
- Release the mouse button and the line will be drawn and
selected, with sizing handles on either end.
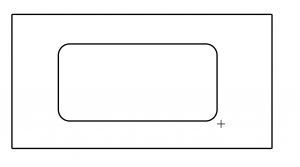
DRAWING RECTANGLES OR ELLIPSES
- Click on the Rectangle or Ellipse tool from the Toolbox
- Click the drag anywhere on the Screen.
- Release the mouse button when the Rectangle or Ellipse
is of the desired size.

To draw a rounded corner Rectangle
- Select the Rectangle
- Click on Element
- Click Rounded Corner. ( The Rounded Corner dialog box appears )
- Choose a corner setting from the preset shapes
- Click on OK.
DRAWING POLYGON
- Click on the Polygon tool from the Toolbox
- Click the drag anywhere on the Screen.
- Release the mouse button when the Polygon is of the desired size.
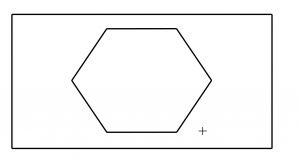
To draw arrange corner Polygon
- Select the Polygon
- Click on Element
- Click Polygon settings. ( The Polygon settings dialog box appears )
- Choose a number of corners setting from the number of sides.
- Arrange the star inset.
- Click on OK.

CHANGING FILLS
- With the pointer tool, select the object you want to Fill.
- Click on Element.
- Click on Fill. The Fill sub menu appears.
- Click on the pattern you want to use.
CHANGING STROKE
- With the pointer tool, select the object whose strokes you want to change.
- Click on Element.
- Click on Strokes. The Strokes sub-menu appears.
- Click on the Stroke you want to use.
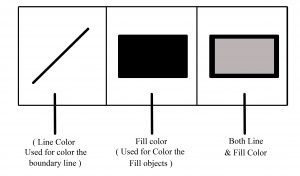
CHANGING COLOR ( TEXT/FILL/STROKES)
- Select the Text / Line / Fill.
- Click on Window Menu
- Click Show Colors
- Select the required color.
TO GO TO A SPECIFIC PAGE IN A DOCUMENT
- Click on Layout.
- Click on go to page. ( The go to page dialog box will appears )
- Type the number of page you want to view.
- Click on OK. The page is displayed
TO INSERT PAGES
- Go to the page before/after you want to insert.
- Click on Layout.
- Click on insert pages. ( The insert pages dialog box will appears )
- Type the number of pages you want to insert
- To insert pages before/after the current page, choose ‘after/before’ from the pop up menu.
- Click on Insert. The new pages are inserted in your publication.
TO REMOVING PAGES
You can remove the unused pages from your document.
- Click on Layout.
- Click on remove pages. ( The remove pages dialog box will appears )
- Type the range of pages you want to remove.
To remove a single page, enter the same page number in the remove page(s) and Through fields in the dialog box. - Click on ok.
- Click on Layout.
- Click on Column guides.
- Write the required column.
- Arrange the space between columns.
- Click on ok.
- Open the page in which you want to insert the picture.
- Choose the pointer tool from the toolbox.
- Click on File.
- Click on place. The place dialog box appears.
- Locate the image you want to place.
- Click on open.(cursor changes to the Place cursor).
- Click anywhere in the document.
The image will be placed at the spot where you clicked.
- Click start
- Click All Programs
- Click Adobe
- Click Pagemaker
- Click Adobe Table 3.0 ( The Adobe Table dialog box appears)
- Click File > Click New.
- Type the number of rows and columns you want, and the height and width of the table.
- The dimensions of the table determine the height of the rows and the width of the columns.
- Click OK.
Font size Increase = Ctrl+Shift+>
Font size Decrease = Ctrl+Shift+<
Font Style, Normal = Ctrl+Shift+Spacebar
Bold = Ctrl+Shift+B
Italic = Ctrl+Shift+I
Underline = Ctrl+Shift+U
Superscript = Ctrl+\
Subscript = Ctrl+Shift+\
Alignment Align Left = Ctrl+Shift+L
Align Center = Ctrl+Shift+C
Align Right = Ctrl+Shift+R
Align Justify = Ctrl+Shift+J
Force Justify = Ctrl+Shift+F
Document setup = Ctrl+Shift+P
Go to Page = Ctrl+Alt+G
Character = Ctrl+T
Paragraph = Ctrl+M
Fill & Stroke = Ctrl+U
Group = Ctrl+G
Ungroup = Ctrl+Shift+G
Zoom In = Ctrl+ +
Zoom Out = Ctrl+ –
Actual Size = Ctrl+1
Fit in Window = Ctrl+ 0
Show Rular = Ctrl+ R
Control Palette = Ctrl+ ‘
Color = Ctrl + J