Introduction to Microsoft Power Point 2007
PowerPoint is a presentation software from Microsoft. It consists of a number of slides containing elements like text, graphics, movies, sound, and graphs. A computer presentation is designed so that the slides are displayed one by one on the screen. It has a set of tools- Wizards, Templates, and Auto Layouts- that help in creating a presentation quickly and easily.
MS PowerPoint creates a single .pptx file containing all that is required for a presentation.
STARTING MICROSOFT OFFICE POWER POINT PROGRAM- Click Start
- Click All programs
- Click Microsoft office
- Click Microsoft office PowerPoint 2007
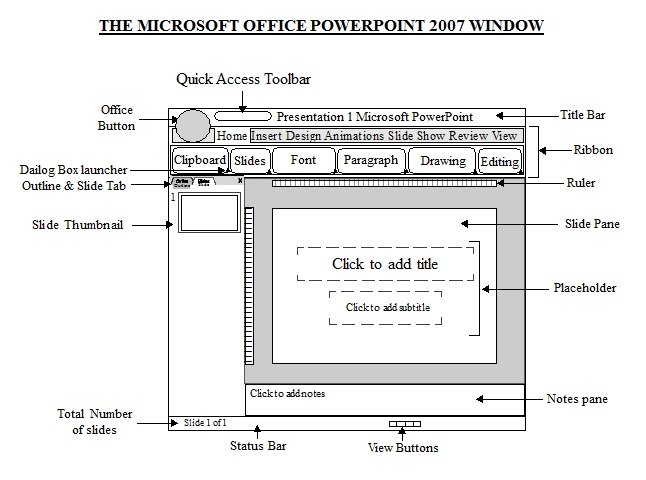
Office Button -This button appears on the upper-left corner of MS PowerPoint window. Clicking this button will display a menu to create a new file, open a file, save a file, etc.
Quick Access Toolbar– This toolbar appears next to the Office Buttons. It contains buttons for the most commonly used commands like Save, Undo, and Redo.
Title Bar – It is located at the top of the PowerPoint window. It displays the name of the presentation currently open.
Ribbon– It is displayed just below the title bar. It contains various tabs and commands divided into groups.
Dialog Box launcher– This is a small icon that appears in some groups. On clicking it, a related dialog box, which provides more option related to that group, open.
Ruler – There are two rulers, vertical and horizontal, to set the margins.
Status Bar – It appears at the bottom of the PowerPoint window. It displays information like the serial number of the current slide and the total number of slide in the presentation.
Outline tabs – It display the text contained in the presentation.
Slide tabs – It displays the thumbnails of all the slides. You can click the thumbnails to view the slide in the Slide pane.
Slide Pane – A slide is displayed in the slide pane at the center of the PowerPoint windows.
Placeholders– It is dotted rectangular box on a slide that is used to hold text, images, etc.
View buttons – These buttons can be used to change between the Normal views, the Slide Sorter View, and the Slide Show view.
- Click the Office Button , and then click New. The New Presentation dialog box appears.
- Under Templates, Click on Blank and recent and select Blank Presentation
- Click Create
- On the Home tab, in the Slides group, click New Slide drop-down arrow.
- Click the slide layout under Office theme that fits your choice
Right-click the slide that you want to delete, and then click Delete Slide.
- Select the slide to duplicate.
- Click the New Slide drop-down arrow on the Home tab
- Click Duplicate Selected Slides.
Microsoft PowerPoint has three main views:
- Normal view
- Slide sorter view
- Slide show view
This is the main editing view that is used to design a presentation and write on it. The normal view has four parts- Outline tab, Slide tab, Slide pane, and Notes pane.
The Outline tab displays the text in your presentation.
The Slides tab displays thumbnail-size images of all your slides. You can click the thumbnails to view the slide in Slide pane. You can easily rearrange, add, or delete slides here.
The Slide pane displays the large view of the currents slide. You can add text, insert tables picture, Smart Art graphics, charts, drawing objects, text boxes, movies, sounds hyperlinks, and animations in this pane
The Notes pane is used to type notes that apply to the current slide.
Slide sorter view is used to see all slides of the presentation in miniature form ( small form ) on the screen. This makes it easy to add, delete and move slides and timings for moving from one slide to another. You can also preview animations in multiple slides by selecting the slide you want to preview. To open a slide in Normal view, just double-click it.
Slide show view is used to display a series of slide one by one in full screen. In this view, you can see how your graphics, timings, movies, and transition effects will look in an actual show.
- In the pane that contains the Outline and Slides tabs, click the Slides
- Click the slide that you want to apply a layout to.
- On the Home tab, in the Slides group, click Layout, and then click a layout. (Select the particular layout such as Title Slide, Title and Content or Two Content from the slide layout )
- Click On the Design tab, in the Themes group, click the document theme that you want, or click More to see all available document themes.
- you can apply a document theme to all slides, to selected slides only, or to the master slide. Right-click the document theme, and then click the option that you want.
On the Design tab, in the Themes group, click Theme Colors
- Click Create New Theme Colors.
- Under Theme colors, click the button of the theme color element that you want to change.
- Under Theme Colors, select the colors that you want to use.
- Tip Under Sample, you can see the effect of the changes that you make. To see how the colors that you select affect styles that you have applied in your document, click
- Repeat step 3 and 4 for all of the theme color elements that you want to change.
- In the Name box, type an appropriate name for the new theme colors.
- Click Save.
On the Design tab, in the Themes group, click Theme Fonts
- Click Create New Theme Fonts.
- In the Heading font and Body font boxes, select the fonts that you want to use.
- In the Name box, type an appropriate name for the new theme fonts.
- Click Save
- Click the slide or slides that you want to add a background style to. To select multiple slides, click the first slide, and then press and hold CTRL while you click the other slides.
- On the Design tab, in the Background group, click the arrow next to Background Styles.
- Right-click the background style that you want, and then do one of the following:
- To apply the background style to the selected slides, click Apply to Selected Slides.
- To apply the background style to all of the slides in your presentation, click Apply to All Slides.
- To replace the background style for the selected slides and any other slides in the presentation that use the same slide master, click Apply to Matching Slides. This option is available only when your presentation contains multiple slide masters.
- On the Design tab, in the Background group, click the arrow next to Background Styles
- Click Format Background, and then choose the options that you want.
No fill To make a slide background transparent or colorless, or to remove fill from a slide background, click this option.
Solid fill To add color and transparency to a slide background, click this option.
Gradient fill To add a gradient fill to a slide background, click this option.
Picture or texture fill To use a picture as fill for a slide background or to add texture to a slide background, click this option.
Apply to All To make the changes to all the slides, and not just the selected slides, click this button.
Reset Background To remove the customizations that you have made from the background and restore the default settings, click this button.
Slide transitions are the animation-like effects that occur in Slide Show view when you move from one slide to the next. You can control the speed of each slide transition effect, and you can also add sound.
Different types of slide transitions, including (but not limited to) the following:- No transition
- Blinds Horizontal
- Blinds Vertical
- Box In
- Box Out
- Checkerboard Across
- Checkerboard Down
- Comb Horizontal
- Comb Vertical
- In the pane that contains the Outline and Slides tabs, click the Slides
- On the Home tab, click a slide thumbnail.
- On the Animations tab, in the Transition To This Slide group, click a slide transition effect.
To see more transition effects, in the Quick Styles list, click the More button . - To set the slide transition speed, in the Transition To This Slide group, click the arrow next to Transition Speed, and then select the speed that you want.
- In the Transition To This Slide group, click Apply to All.
- In the pane that contains the Outline and Slides tabs, click the Slides
- On the Home tab, click a slide thumbnail.
- On the Animations tab, in the Transition To This Slide group, click the slide transition effect that you want for that slide.
To see more transition effects in the Quick Styles list, click the More button . - To set the slide transition speed, in the Transition To This Slide group, click the arrow next to Transition Speed, and then select the speed that you want.
- To add a different slide transition to another slide in your presentation, repeat steps 2 through 4.
In normal view, display the slide that has the text or objects you want to animate.
- Select the object you want to animate.
- On the Animations Tabs Menu, click ‘Custom Animation’.
- In the Custom Animation task pane, click ‘Add effect’.
- If you want to make the text or object enter the slide show presentation with an effect, point to ‘Entrance’ and point to ‘more effect’ then click an effect. Click on ok.
- If you want to add an effect to text or an object that is on the slide, point to ‘Emphasis’ and point to ‘more effect’ then click an effect. Click on ok.
- If you want to add an effect to text or an object that makes it leave the slide at some point, point to ‘Exit’ and point to ‘more effect’ then click an effect. Click on ok.
- If you want to add an effect that makes an object move in a specified pattern, point to ‘Motion Paths’ and then click an effect.
- If you want to add an effect that makes an object move in a specified pattern, point to ‘Motion Paths’ and point to ‘more motion path’ then click an effect. Click on ok.
- Click on View tabs menu.
- Click on slide show or press F5
- +91-9864999330
- +91-9954084500
- info@eaiteducation.com