Introduction to Corel Draw 12
Coral draw is one of the most important applications used in designing through which you can design any type of picture, logo or monogram. This vector-based drawing program can be used to create an advertisement for any company, birthday cards, logos, Boucher and newspaper to World Wide Web Pages. CorelDraw offers a complete set of tools for creating much kind of drawings and multi page documents. CorelDraw tools are designed to meet the demands of the graphic arts professional. Each of the tools used in CorelDraw has one special work associated with it. With these tools we can type and zoom the text, draw objects, fill circles and lines with colors and do many more things.
If you are new to CorelDraw, the program may seem complex at first because it is so rich in features, but if you take it one step at a time you’ll soon be creating impressive drawings. CorelDraw is windows based application and it is necessary to have an operating system (Windows 98, Windows XP, Windows 7 etc.) installed in the system.
Before you get started with CorelDraw, you should be familiar with the following terms.
 STARTING CORELDRAW
- Click on start button. The Start menu will appear.
- Click on All Programs.
- Click on CorelDRAW Graphics Suite 12.
- Click on CorelDRAW 12.
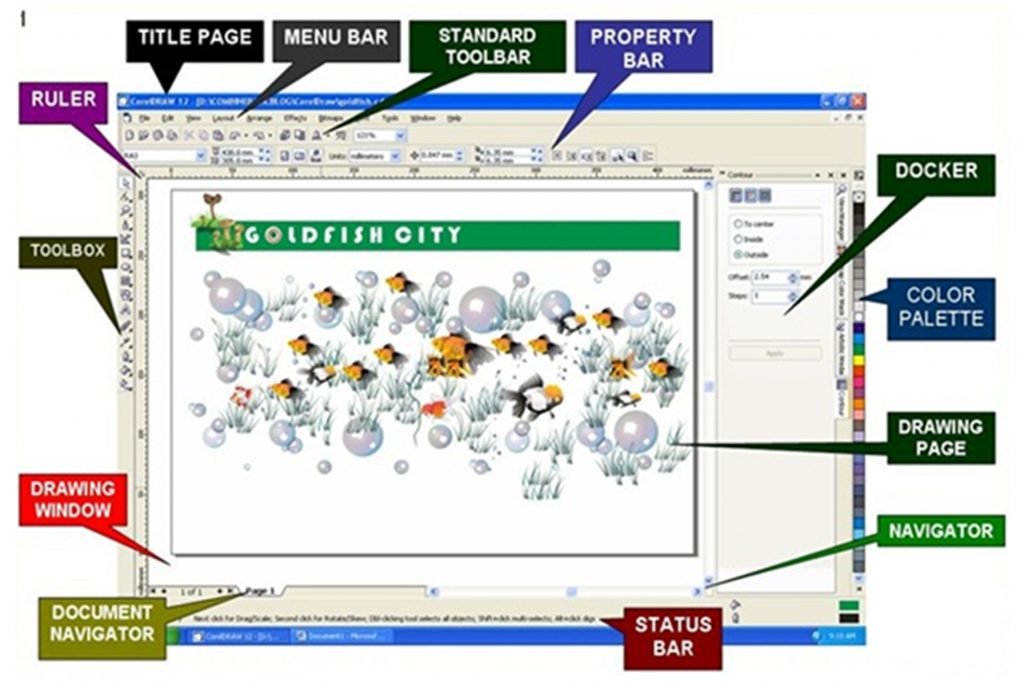
A program’s interface refers to the way it looks and to the controls, dialog boxes and other components that enables you to interact with it. When you launch CorelDraw, the application window opens containing a drawing window. The rectangle in the center of the drawing window is the drawing page where you create your drawing. Although more than one drawing window can be opened, you can apply commands to the active drawing window only.
Title Bar
It displays the name of the program, the name & Location of the currently active word document, the Control menu icon, the Maximize button, the Minimize button and the Restore and Close button.
Menu Bar
The Menu Bar is positioned below the Title bar. It contains options like File, Edit, View and Format etc. Each of these menu bar items has drop-down menus. [Drop-down menu comprises a list of options which drops down when you click on the menu bar item]
Standard Toolbar
The standard toolbar contains buttons that are shortcuts to many of the menu commands. It provides access to common windows commands, such as New, Open, Save and Print etc.
Property Bar
This bar has icons and drop-down lists that change dynamically, depending on what is selected and which tool is active. It displays the most commonly used functions that are relevant to the active tool or to the task you’re performing. Although it looks like a toolbar, the property bar contents changes depending on the tool or task.
For example, when you click the Text tool in the Toolbox, the property bar displays only text related commands, such as text, formatting, alignment, and editing tools.
Rulers
These are the Horizontal and the vertical borders that are used to determine the size and position of objects in a drawing.
Guidelines:
Guidelines let you align and position objects with precision. There are three types of guidelines: horizontal, vertical and slanted, which you can use by clicking and start dragging from the top of the ruler.
Toolbox
It is a floating bar with tools for creating, filling, and modifying objects in the drawing.
Drawing page
This is the rectangular area inside the drawing window. It is the printable area of your work area.
Window
This is the area outside the drawing page bordered by the scroll bars and application controls.
Color palette
It is a bar that contains color swatches. You use a color palette to fill and outline objects with color. There are many predefined color systems that can be loaded into the color palette.
Status bar
This is a bar at the bottom of the application window that contains information about object properties such as type, size, color, fill and resolution. The status bar also shows the current mouse position.
Docker window/palette
This is a window containing available commands and settings relevant to a specific tool or task
TOOLS
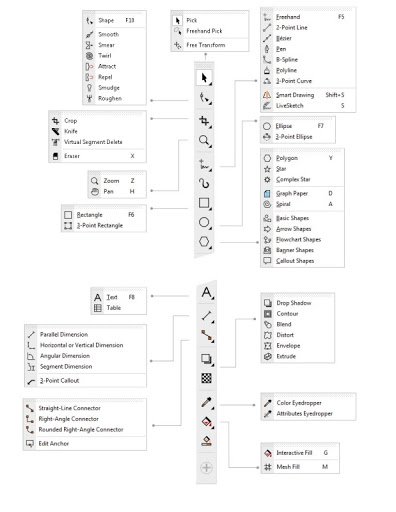
This tool is called a pick tool or arrow tool. This tool can be used in the following way:
It can be used to select any text, object or picture by clicking it using the left mouse button or by defining the area for the objects to select.
It can be used to move any text, object or picture from one place to another by Drag and drop method (Click and Hold down the left mouse button and then drag to the position to where you want to move and then leave the button.)
We can use drag and drop method to make the duplicate copy of text, object or picture by Clicking right mouse button before leaving the left mouse button.
We can also rotate or skew a Text, object or picture by Clicking for two times.
This tool is called shape tool or node tool. It lets you edit the shape of objects by editing the nodes and lines.
This tool is used to cut an object into pieces. This tool can be used in the following two ways:
Click on the outline of the object from where you want to start cutting and drag the knife tool up to the location to which you want to cut the object and then leave the mouse button.
OR
Click and leave the left mouse button to start cutting and then move the knife to the desired location (up to where you want to cut) and click again to cut the object.
The Eraser tool lets you remove/erase areas of your drawing object. It can be used in the following two ways:
Click and drag the eraser.OR
Click and leave the button and then move the cursor to the desired location ( up to where you want to erase) and click again to erase.
Note: we can change its shape from circle to square. And can also increase or decrease its size by using options available in the property bar.
The Smudge brush tool lets you distort a vector object by dragging along its outline. It can be used in the following way:
- Click and start dragging on the outline.
The Roughen brush tool lets you spread the area of the object by dragging along the object.
The Free transform tool lets you transform an object by using the free rotation, Angle Rotation, Scale, and Skew tools. It can be used in the following way:
Select the type of transformation from the property bar and then click to select and drag the object to transform.
This tool can be used to change the magnification level in the Drawing window. It can be used in the following way:
Select this tool from the tool box by clicking on this tool with the left mouse button.
Click and drag to define the area that you want to zoom.
The Hand tool lets you control which part of the drawing is visible in the drawing window. It can be used in the following way:
Click and drag the drawing window to show the area you want to see.
The Freehand tool lets you draw single line segments and curves. It can be used in the following two ways:
Click and drag by holding the left mouse button
ORClick for the starting point or click for ending point.
Note: To draw a straight line press Ctrl key while using the second step
The Bezier tool is used to draw curves using a connect the dots style of drawing. Using this tool you can draw continuously and also drag to make the line curve. If you click on the node from where you started to draw, then the figure gets closed in which you can also fill color.
The Artistic media tool provides access to the Brush, Sprayer, Calligraphic, and Pressure tools.
The Pen tool lets you draw curves one segment at a time.
The Polyline tool lets you draw lines and curves in preview
mode.The 3 point curve tool lets you draw a curve by defining the start, end, and center points.
The Interactive connector tool lets you join two objects with a line.
The Dimension tool lets you draw vertical, horizontal, slanted, or angular dimension lines. Using this tool you can measure various dimensions (i.e. height, width, etc) of on object.
It is used to fill any enclosed area. Unlike other fill tools, which fill only objects, the smart fill tool detects the edge of an area and creates a closed path so that the area can be filled.
The Rectangle tool lets you draw rectangles and squares.
To draw the box press the left mouse button on the place, from where you want to start drawing. The box and then drag the mouse towards the right side. When you have drawn the box then leave the mouse button.
(Press ctrl key while dragging the mouse to draw the square)
To use this tool either click on this tool or press F6 key from the keyboard.
The 3 point rectangle tool lets you draw a rectangle by dragging to create the rectangle baseline and clicking to define its height.
The Ellipse tool lets you draw ellipses and circles.
To draw the circle press the left mouse button and drag it towards the right side.
To use this tool either click on the circle tool with the mouse or press F7 key.
The 3 point ellipse tool lets you draw an ellipse by dragging to create the center line of the ellipse and clicking to define its height.
The Graph paper tool lets you draw a grid of lines similar to that on graph paper.
(Using this tool you can draw a graph which contains number of boxes specified by you into rows and columns.)
The Polygon tool lets you draw polygons and stars with the number of sides specified by you.
The Spiral tool lets you draw symmetrical and logarithmic spirals
The Basic shapes tool lets you choose from a full set of shapes, including hexagram, a smiley face, and a right-angle triangle This option contains list of various basic shapes (like rectangle, triangle, smile etc) from which you can select the shape and then draw then by. Dragging with left mouse button towards the right side.
The Arrow shapes tool lets you draw arrows of various shape, direction, and number of heads.
(This option contains list of various arrow shapes from which you can select type arrow and then draw the by dragging with the left mouse button towards the right side.)
The Flowchart shapes tool lets you draw flowchart symbols.
The Star shapes tool lets you draw ribbon objects and explosion shapes.
The Callous shapes tool lets you draw callous and labels.
The Text tool lets you type words directly on the screen as artistic or paragraph text.
(Using this tool we can type any text matter. There are two ways from which you can type any matter:-
- Click and start typing.
Click and at rag to specify on area in which you want to write.
To use this tool either click on the text tool using mouse or press F8 key.)
The Interactive blend tool lets you blend two objects.
(Using this tool you can merge any two shapes with one another.)
The Interactive contour tool lets you apply a contour to an object.
(Using this tool you can make duplicate of shape in or outsides of that particular shape.)
The Interactive distortion tool lets you apply a Push or Pull distortion, a Zipper distortion, or a Twister distortion to an object.
(Using this tool you can distort any object meaning you can the twist or you can even make the outlines zigzag.)
The Interactive envelope tool lets you distort an object by dragging the nodes of the envelope.
(Using this tool you can change the shape of any object by considering it as it would be in on envelope.)
The Interactive extrude tool lets you apply the illusion of depth to objects.
(Using this tool you can make any object 2-dimensional.)
The Interactive drop shadow tool lets you apply a drop shadow to an object.(Using this tool you can give shadow to any object or text.)
The Interactive transparency tool lets you apply transparencies to objects.
(Using this tool you can make any ….using various option.)
The Eyedropper tool lets you select a fill from an object on the drawing window.
(Using this tool you can pick your favorite color from any object or picture and later on you can fill it on object or text.)
The Paint bucket tool lets you fill an object on the drawing window after selecting a fill using the Eyedropper tool.
(Using this tool you can fill your picked color in on object.)
The Outline tool lets you apply various outline styles, colors and widths.
(This bar of tool contains various sub tools from which you can format the outlines.)
The Fill tool lets you set the fill properties.
The Interactive fill tool lets you apply various fills.
(Using this tool you can fill color and various effects inside on object and can also sets its position.)
The Interactive mesh tool lets you apply a mesh grid to an object.
(Using this tool you can fill the objects with various colors by selecting the nodes of mesh.)
- +91-9864999330
- +91-9954084500
- info@eaiteducation.com